MOLCAS
Introduction
The MOLCAS package, developed by a team of researchers at Lund University and around the world, is a suite of programs designed for accurate ab-initio calculations of ground and excited states of electronic systems. It has been especially tailored for situations with highly degenerate states, and also allows for geometry optimizations. Due to licensing restrictions, MOLCAS is not available for all users.
How to submit a MOLCAS job
In order to submit and run a MOLCAS job via SGE, you basically have to do three things:
- Select the parallel environment (PE) molcas (or molcas_long if your job runs more than 8 days, in which case you must also add the directive #$ -l longrun=true), and specify the number of slots; e.g., if your MOLCAS job is supposed to run on 16 cores, your SGE submission script would contain the directive:
#$ -pe molcas 16
- Load the molcas environment module, i.e., add the line
module load molcas
to your job submission script
- Start the MOLCAS calculation as usual; e.g., the last lines of your SGE script might look as follows:
export MOLCASMEM="1024"
export MOLCASDISK="100000"

export Project="MyProject"
export Outfile="MyProject_${JOB_ID}.out"

cp -p ${Project}.inp ${WorkDir}
cd ${WorkDir}

molcas ${Project}.inp > ${OutFile} 2>&1

exit 0
Note that it is always a good idea to change into the (auto-generated) MOLCAS working directory ${WorkDir} before starting the actual calculation; that way, all scratch files will go to the local disk and not pollute your home directory (here, the directory ${PWD} the job was submitted from). On the other hand, we save the output of the molcas command (a text file which usually is not very large) directly into the homedirectory. This may be useful for error analysis if the calculation fails, while everything in ${WorkDir} will automatically be erased once the job has finished (or crashes). If you need to keep files from ${WorkDir} for later usage, you have to manually copy them to your homedirectory (i.e., after the molcas command but before the exit command in your SGE script.
It is extremely important that you must not, under any circumstances, change the value of the WorkDir environment variable (i.e., the location of the working directory of MOLCAS). The working directory is set by the molcas environment module, and if you change it, your MOLCAS job is likely to crash. You can access the working directory as usual, copy files to and from it (cf. the above example script), but please do never change the location of the working directory itself!
How to configure a (parallel) MOLCAS job
The proper configuration of a MOLCAS job is a highly non-trivial task. Learning how to do this is important not only for the sake of optimizing the performance of your own jobs, but also in order to ensure an efficient usage of our HPC resources. A wrong configuration of your MOLCAS jobs may lead to an unnecessary waste of resources which are then unavailable for other users.
First, note that every MOLCAS job is, by definition, a "parallel" job, i.e., you must specify the PE molcas. A "serial" MOLCAS job is a parallel job running on a single slot (#$ -pe molcas 1).
As a second, preliminary remark, you should be aware that only a subset of all MOLCAS modules is fully parallelized. The following modules are known to parallelize rather well (this list may be incomplete, and change over time since MOLCAS is under active development and the parallel features are rather new):
- SEWARD
- SCF
- RASSCF
- ALASKA
- MCKINLEY
- MCLR
The other modules may be run in parallel, but you won't obtain any speed-up. However, it is possible that you get a speed-up in a parallel run even for some of the other modules (e.g., CASPT2) if a certain computational task can be trivially parallelized (divided into independent sub-tasks). This seems to be the case, e.g., for a numerical gradients calculation (according to the MOLCAS developers).
Properly configuring your MOLCAS job basically requires the following three steps:
- Step 1: Perform a number of test runs under well-defined, reproducible conditions, starting with a single core, then using multiple cores of a single node, then running your job across nodes.
- Step 2: Carefully analyze the results and try to figure out what determines the performance of your job (often with MOLCAS, it's I/O)
- Step 3: Taking the conclusions of Step 2 into account, customize the SGE directives in your submission script accordingly
Example
We illustrate the above procedure with a "real-world" example, i.e., the calculation of an excited state of a CO molecule adsorbed on one of the edges of a Buckminsterfullerene (C60) molecule (courtesy of J. Mitschker). This job makes of the SEWARD and RASSCF modules and is rather I/O and memory intensive (as is characteristic for many MOLCAS calculations), writing about 30 GB of scratch files to the local disk and doing a lot of disk writes and, in particular, reads. The value of the MOLCASMEM variable has been set to 1024 (corresponding to 1 GB per core). Note that as to the virtual memory (per core) that you reserve for your SGE job using the h_vmem attribute, you will have to factor in a significant overhead in order to avoid your job running out of memory. How large this overhead is, depends on the actual calculation and must be found by trial and error. An overhead by a factor of 1.5 - 2 is usually enough.
Increasing the value of MOLCASMEM significantly does not speed-up the calculation, but in contrast leads to a performance degradation (contrary to what one may naively expect).
On a single core (on a node on which no other job is running) the above job takes
to complete.
We now perform the three steps necessary for finding the correct configuration of the job as outlined above:
- Step 1: Test runs
To run the job on a single node on 1, 2, 4, 6, 8, ... cores, we set the exclusive attribute to true, and specify the request the corresponding number of slots (h_vmem will be chosen to be 1900M). E.g., to run the job on 4 cores of a single node, the relevant lines of the submission script are#$ -l h_vmem=1900M #$ -l exclusive=true #$ -pe molcas 4
The exclusive node reservation ensures that no other job will be running on that same node.
Now, to run the job across nodes, we again take advantage of exclusive node reservation and adjust the value of h_vmem to control how many cores per node are actually used by the job. Recall that a standard, mpcs-class node has 23G (23000M) of memory available to user jobs. Thus, in order for your job to use- exactly 2 cores per node, choose h_vmem=11500M (or any value > 5750M and ≤ 11500M),
- exactly 4 cores per node, choose h_vmem=5750M (or any value > 2875M and ≤ 5750M),
- ...
- The total number of jobs requested then determines how many nodes will be used. E.g., if you request 24 slots and choose h_vmem=5750M, your job will be running on 6 nodes using exactly 4 cores per node.
- Step 2: Analyzing results
The following figure shows the speed-up obtained for various configurations (single node, across nodes with varying number of cores per node) as a function of the total number of cores, N: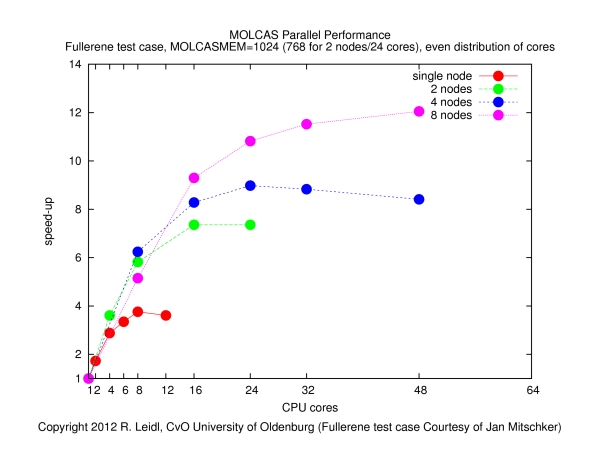
The speed-up is defined byspeed-up = runtime on a single core / runtime on N cores
The results show that- it makes no sense to use more than about 4 cores per node (if the job runs on more than 4 cores per node, the speed-up curves become flatter, such that the performance by the additional cores does not justify the waste of resources),
- the main performance gain is obtained if the job is spread across nodes, since that way the I/O load is distributed more evenly (memory bandwidth may also play a role).

- The contention of MPI tasks fighting for memory and, in particular, I/O bandwidth may be the reason for the poor behavior if more than 4 cores per node are used. Clearly, the behavior of this job is dominated by I/O, and in order to optimize the performance, the I/O load must be spread across many nodes. It is also clear that (at least for this calculation) MOLCAS does not parallelize to more than a few dozen of cores. Therefore, it makes no sense to request more than, say, a total of 32 slots in this example.
- Step 3: Customizing job submission script
The above conclusions suggest that the job should be configured as follows:- No more than 4 cores per node should be used, thus we may set, e.g., h_vmem=5000M.
- The total number of cores should not be larger than 32 (e.g., 16 or 24 would be a decent choice); here we take the number of cores to be 32.
- An important question is whether we should use exclusive node reservation as for the test runs. In fact, using exclusive node reservation would be a waste of resources and should therefore not be used. The job would always claim 8 nodes, but use only a fraction of the cores (32 out of 96) and of the total memory available. This would be inefficient use of cluster resources! A better alternative is to omit the #$ -l exclusive=true directive, and let the queueing system distribute the job "freely" across the cluster (i.e., SGE will try to allocate free cores, not free nodes). This may even improve the performance since the job is likely to get distributed across more than 8 nodes (using, e.g., only one or two cores on most of the nodes, while all or part of the remaining cores are occupied by other jobs).
- In general, other jobs will then run on the same nodes, too. This is of no harm (neither for the MOLCAS job, nor for the other jobs), there is only one point to keep in mind. If there were another I/O intensive job (e.g., another MOLCAS job) running on the same node, this would adversely affect the performance of all jobs on the node. Avoiding such a situation is not trivial, but a simple measure is to request a large amount of disk space (e.g. 700G), which usually should keep other I/O intensive jobs at bay (recall that a standard, mpcs-class node has 800G of requestable disk space).
- Summarizing, the relevant lines of the SGE submission script may hence look as follows:
#$ -l h_vmem=5000M #$ -l h_fsize=700G #$ -pe molcas 32
Using the above configuration, the job (in a "typical" run) took
to complete and ran on 20 nodes (using between 1 and 2 cores per node). All nodes were shared among jobs of different users. Note that this is a speed-up by a factor of more than 13 compared to the single-core calculation and an impressive demonstration what can be achieved by properly configuring your MOLCAS (and other parallel) jobs, while at the same time leaving a minimal footprint and using the HPC resources in a very efficient manner!
A final remark: the CASPT2 module is even much more memory and I/O intensive than the SEWARD and RASSCF used in the above job. If the above RASSCF calculation is supplemented by a CASPT2 calculation (for this, the values of MOLCASMEM and h_vmem must be increased significantly), the job takes
to complete on a single core (there is no speed-up by using more than one core, since CASPT2 itself is not parallelized). If, on the other hand, the same job runs on one of the big nodes (this requires the directive #$ -l bignode=true instead of the standard-class nodes, the job completes in a whopping
This performance gain by a factor more than 5 is due to the high-performance, SAS disk array which the every big node is equipped with. Clearly, such I/O intensive jobs like MOLCAS CASPT2 calculations strongly benefit from this I/O performance. The big nodes should therefore only be used for such highly specialized tasks, and not for the usual run-of-the-mill jobs.
Known issues
- Parallelization in MOLCAS is relatively recent, and you should not be too surprised if a parallel jobs fails. Errors may also come from the Global Arrays Toolkit, on which all of the parallelization of MOLCAS rests. Running the job on a single core usually helps.
- The CASPT2 module sometimes (depending on the job) fails to run across nodes (it does run on multiple cores of a single node, though). This should not be too much of a problem, since CASPT2 is not fully parallelized, and running the module in parallel does not yield a performance gain anyway (cf. the remark above).
Documentation
There is detailed User Manual (over 500 pages) as well as a Short Guide. Those who want to dig deeper into the inner workings of MOLCAS may consult the Programming Guide.