Configuration MDCS 2016
Introduction
In general, jobs on the HPC clusters CARL and EDDY have to be submitted via the job scheduler SLURM, which takes care of sharing the available resources (mainly CPU cores and memory). For Matlab jobs, the Matlab Distributed Compute Server (MDCS) provides an easy interface for users running Matlab on their local computer (referred to as the client). Basically, a few Matlab commands on the client generate a set of files, which are transferred to the cluster, where a SLURM job is submitted. Once this job is completed, the results are automatically transferred back to the client.
Obviously, in order for the process to work, some configurations on the client side have to made. These configurations are explained below for Matlab R2016b (but with small adjustments should also work for other versions of Matlab if available on the cluster).
Prerequisites
The following preparations are required before the configuration of the client can be done:
- Some of the steps during the configuration require that you have administration rights on your local machine. Talk to your local system administrator in case you do not have these rights.
- Install a version of Matlab that is supported on the cluster on your local machine (the client). The currently supported versions are R2016b, R2017b and R2018b. It is recommended to use the latest version available as the performance should be better. To install Matlab, please refer to instructions on the web page of the IT services (follow the link to the download section - a login is required). Make sure that you install all the required packages/toolboxes, in particular the Parallel Computing Toolbox is required.
- Identify the matlabrootdir on your machine, on Linux systems this is usually /usr/local/MATLAB/R2016b/ and on Windows systems C:\Program Files\MATLAB\R2016b. In Matlab you can type matlabroot to print the root directory.
- You must be able to connect from your local machine to the login nodes of the cluster via ssh. See Logging in to the system for more information. Windows user can use programs like PuTTY or mobaxterm (recommended) for this purpose.
System-wide Integration
The following steps need to be done once (per version of Matlab) on a local machine running Matlab (note that there have been a number of changes since Matlab R2017b):
- Download the MDCS SLURM-integration files appropriate for the version of Matlab that you want to use:
- Matlab R2016b: MDCS_SLURM-Integration_R2016b.zip
- Matlab R2017b and R2018b: MDCS_SLURM-Integration_R2017b.zip
- Matlab R2019b onwards: MDCS_SLURM-Integration_R2019b.zip
- Unpack the zip-file, you should find the following files:
- communicatingJobWrapper.sh
- communicatingSubmitFcn.m
- createSubmitScript.m
- deleteJobFcn.m
- extractJobId.m
- getJobStateFcn.m
- getRemoteConnection.m
- getSubmitString.m
- independentJobWrapper.sh
- independentSubmitFcn.m
- cancelJobFcn.m (not in R2016b)
- getCommonSubmitArgs.m (not in R2016b)
- communicatingJobWrapperSmpd.sh (only in R2019b)
- validatedPropValue.m (only in 2019b)
- Copy all the files from above to the directory MATLABROOTDIR/toolbox/local/. You need to have admin rights for this step. If you are using Matlab R2017b or later you can copy the files to any location on your computer (and therefore you can do without admin rights).
- If the version of Matlab you want to configure is currently running, then exit it (and restart it for the next section).
User-specific configuration
The following steps have to be performed by every user once after the system-wide integration was completed (see above). This part of the configuration may also differ somewhat in details for different versions of Matlab. The following steps are based on R2016b but work also for R2017b and later (in some places the process differs, the instructions tell you where).
- (Re)Start Matlab R2016b on your local machine (this is required so that the previous configuration becomes active).
- (only needed in R2018b and later) Type the command
rehash toolbox
- In HOME tab under Environment click on Parallel --> Manage Cluster Profiles.
- In the new window click on Add --> Custom --> Generic.
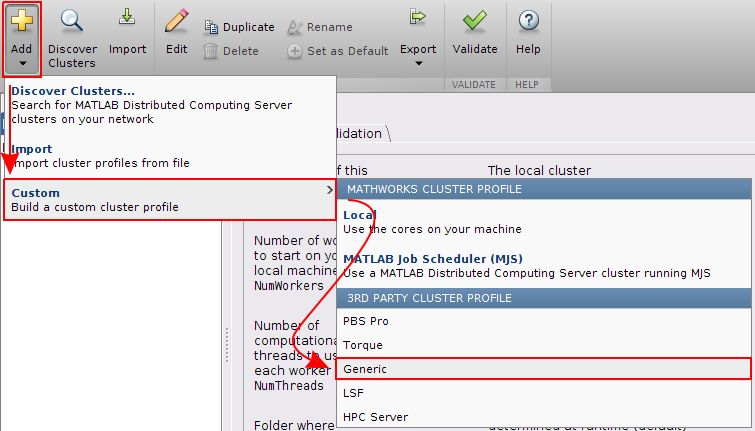
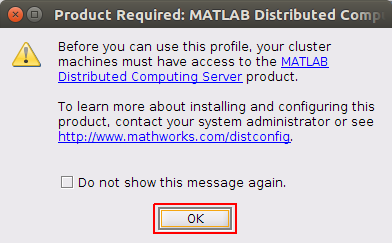
- A notification will pop up, confirm with OK.
- A new Cluster Profile appears is the list with the name GenericProfile. Right-click and select Rename. Enter 'CARL' (without the ') as the new name (if you prefer a different name, e.g. EDDY, then you have to replace CARL with your name in the later examples).
- Right-click on the new profile name and select Edit.
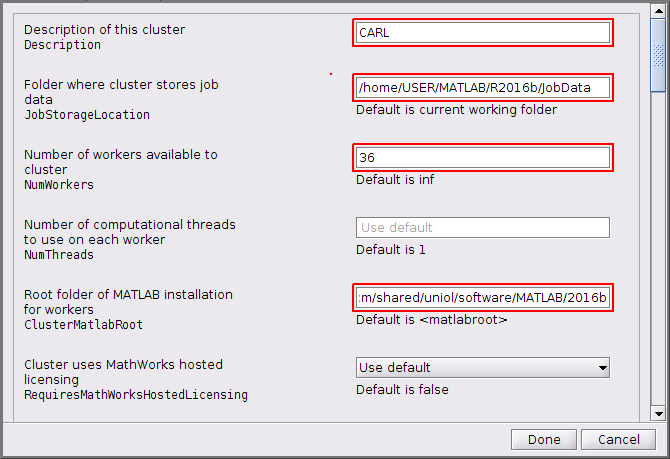
- Now enter the following information (from top to bottom):
- Description: CARL (can be anything really)
- JobStorageLocation: a directory on your local machine where Matlab can store data from submitted jobs. On Linux systems this could be:
- /home/USERNAME/MATLAB/R2016b/JobData
- and on Windows systems:
- C:\Users\USERNAME\Documents\MATLAB\R2016b\JobData
- In case it does not exist the directory has to be created. Note, that it is strongly recommended to use different directories for different versions of Matlab.
- NumWorkers: 36 (this is the maximum number of workers per job)
- ClusterMatlabRoot: where Matlab is installed on the cluster, enter the following (for R2016b)
- /cm/shared/uniol/software/MATLAB/2016b
- The integration of the scheduler has changed with R2017b, depending on your version do the following:
- Before Matlab R2017b skip to the section Submit Functions and enter for IndependentSubmitFcn:
- {@independentSubmitFcn, 'carl.hpc.uni-oldenburg.de', '/gss/work/abcd1234/MATLAB/R2016b/JobData'}
- and for the CommunicatingSubmitFcn:
- {@communicatingSubmitFcn, 'carl.hpc.uni-oldenburg.de', '/gss/work/abcd1234/MATLAB/R2016b/JobData'}
- EDDY users may replace carl with eddy, of course. The last entry is a directory where Matlab stores Job data during run time. Besides the /gss/work directory you could use /user, or /nfs/data, but /gss/work is strongly recommended because of performance reasons."abcd1234" has to be replaced with your own user name. Create a new directory if it does not exist, and use a different directory for every version of Matlab.

- Since Matlab R2017b skip to the section Scheduler Integration and in the field IntegrationScriptsLocation enter the folder where you put the files from the zip file
- (e.g. <matlabroot>/toolbox/local). In addition you need to add the following to AdditionalProperties:

- Set the property ClusterHost to carl.hpc.uni-oldenburg.de as type String.
- Set the property RemoteJobStorageLocation to /gss/work/abcd1234/MATLAB/R2019b/JobData as type String, of course replace your own user name and also create the directories as needed on the cluster.
- With Matlab R2019b or later, the integration also allows to set AdditionalProperties for the login to the cluster:
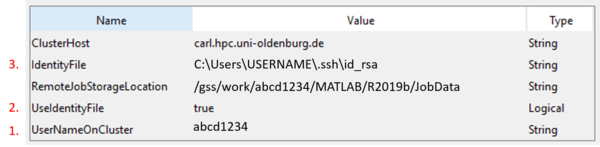
- The property UserNameOnCluster can be used to set your login name. Matlab will no longer prompt for your login name.
- The property UseIdentityFile of tpye Logical can be set to false to prevent Matlab from asking if you want to use one. Together with the user name above you will only be prompted for your password.
- If you want to use an identity file (set 2. to true), you can use IdentityFile to set the file name as a String. On Windows systems, this is likely C:\Users\USERNAME\.ssh\id_rsa, for Linux you probably have to use /home/USERNAME/.ssh/id_rsa. Also see the instructions for setting up SSH keys (here a key without passphrase should be used). With this setup, login to the cluster is automatic, no more prompts.
- In the section Cluster Environment (which is before Scheduler Integration since R2017b) set
- OperatingSystem to 'unix' and
- HasSharedFilesystem to 'false'
- Skip ahead to Jobs and Task Functions (only needed before R2017b) and enter
- for GetJobStateFcn: @getJobStateFcn
- and for DeleteJobFcn: @deleteJobFcn
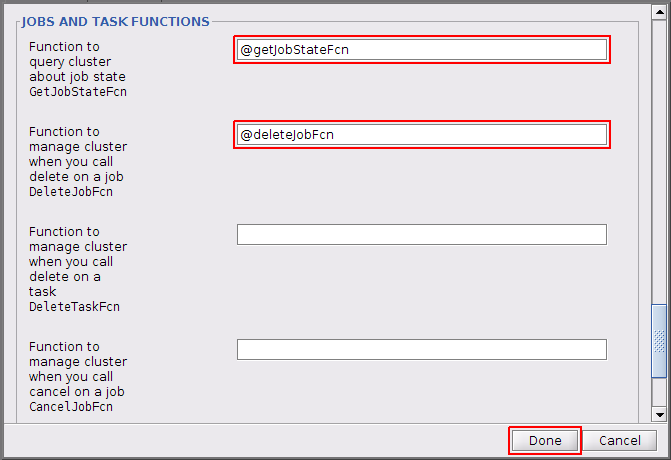
- Click on Done.


Validation
After completing the previous step, you can validate your configuration.
- Click on the Validation tab. You will see the five validations steps (of which up to four can be unselected if desired).
- Enter '4' in the field 'Number of workers to use' and start the validation (you can start the validation with a larger number of workers but that will take much longer).
- Click on the check mark to validate your created profile.
- Enter your username:
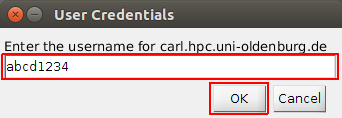
- Click on "No" for the credential file.

- Enter your password:
- After a few minutes the first four tests should have passed successfully, the last one may fail but that can be ignored (and skipped). If one of the other tests fails, click on 'Show Details' to get more information. If you need help, copy the Validation Results and send an e-mail to Scientific Computing.


Note: If it takes ages for the "Job Test (createjob)"-step to be finished, the cluster might be too busy to run the job instantly. A possible solution is either to wait for the job to start on its own or to change the timelimit of the job to one hour. You can use this command to do so:
scontrol update jobid=<JOBID> TimeLimit=0-01:00:00
After the validation was successful you are ready to use Matlab on the cluster for your own applications. See the Matlab examples in the Wiki.