KNIME 2016
Introduction
KNIME Analytics Platform is the open source software for creating data science applications and services.
KNIME stands for KoNstanz Information MinEr.
Installed version
The currently installed version is available on the environment hpc-env/6.4:
KNIME/3.6.2
KNIME Module
If you want to find out more about KNIME on the HPC Cluster, you can use the command
module spider KNIME
This will show you basic informations e.g. a short description and the currently installed version.
To load the desired version of the module, use the command, e.g.
module load KNIME
Always remember: this command is case sensitive!
Using KNIME on the HPC Cluster
Basically, you have two options to use KNIME on the HPC cluster: 1) you can start KNIME within a job script and execute a prepared workflow or 2) you can use the SLURM Cluster Execution from your local work station to offload selected nodes from your workflow to the cluster. Both option are described briefly below.
Using KNIME with a job script
This approach is straight-forward once you have prepared a workflow for the execution on the cluster. That means you need to copy all the required files to a directory on the cluster (the worflowDir). After that you need to write a job script which calls KNIME and runs your workflow. A minimal example is
#!/bin/bash

#SBATCH --partition carl.p

knime -nosplash -application org.knime.product.KNIME_BATCH_APPLICATION -workflowDir="$HOME/knime-workspace/Example Workflows/Basic Examples/Simple Reporting Example"
The workflow in this example is available once you started the KNIME gui on the cluster (which is recommended to do once). Additional SLURM option may used to request memory, run time and other resources (see elsewhere in this wiki for details). Furthermore, there are also other option to run KNIME in batch mode, e.g. to request memory for the Java Virtual Machine. Please refer to the documentation of KNIME for details.
Using KNIME with the SLURM Cluster Execution Plugin
The SLURM Cluster Execution Plugin allows you to offload some nodes in your workflow to the cluster. To use the plugin you need to install and configure it first as described here. Please note, that the plugin is not officially supported by KNIME. It can be used as it is, however if you question please send them to Scientific Computing.
Prerequisites
You need to install the same version of KNIME locally that you want to use on the cluster (older versions might be ok, but newer version may fail). You also need to be able to connect to the cluster with ssh, optionally you can prepare an identity file for the login. It is also recommended to start the KNIME gui once on the cluster to create the default workflowDir in your HOME directory. Alternatively, you can create one manually.
Installing the Plugin
- Download the plugin [zip]
- Unpack the zip-file on your local computer
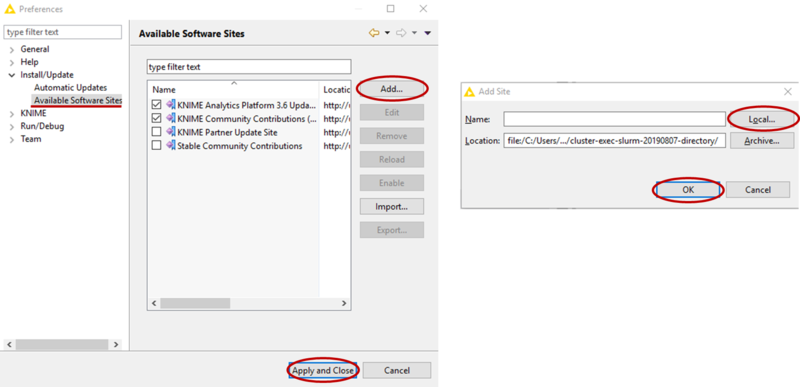
- Open KNIME and go to File-->Preferences
- Add the location of the directory form step 2 as a software site (see picture)
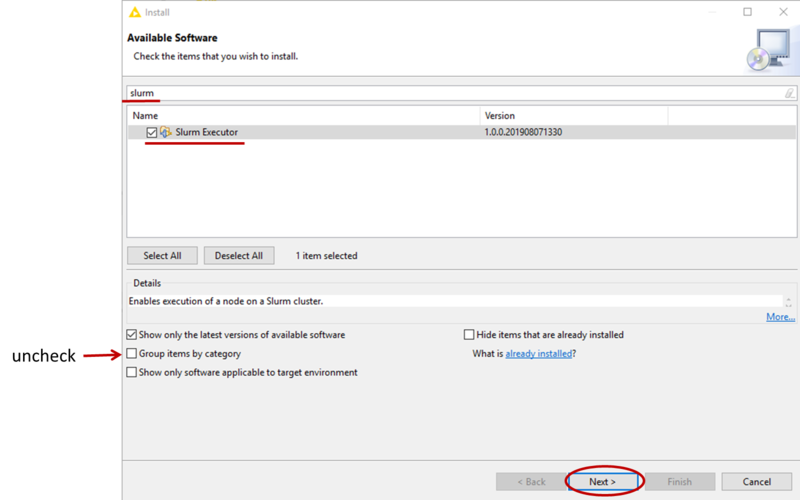
- Now go to File-->Install KNIME Extension, if needed uncheck Group items by category, then find the Slurm Executor and check it for installation (see picture). Then click Next and follow the instructions to install the extension (at the end, do not worry about the security warning and confirm the installation).
- After the installation of the plugin you need to restart KNIME (it will ask you to do so).
Configuration of the Slurm Executor
- Once you have installed the plugin and restarted KNIME, go to File-->Preferences again.
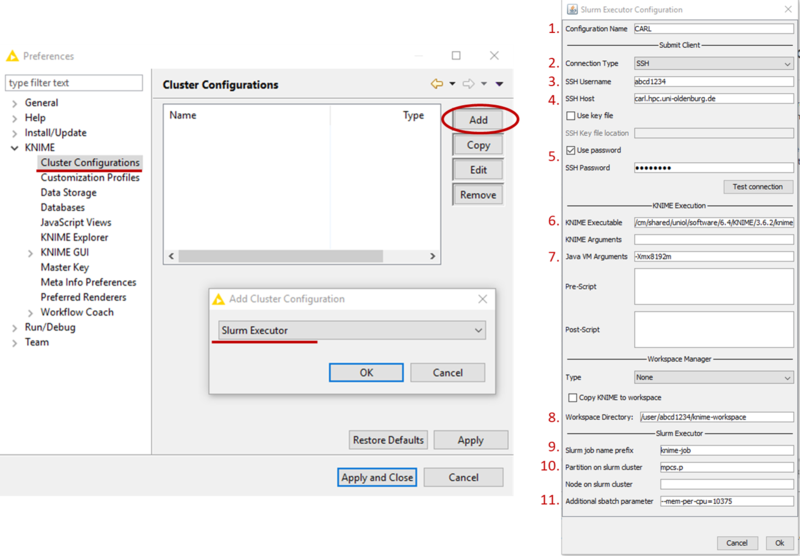
- Select the Cluster Configuration under KNIME and click Add (see picture below)
- From the drop-down list, select Slurm Executor and confirm with Ok (see picture below)
- Enter the following information in the appropriate fields (see picture above)
- Configuration Name: CARL (or any other name you wish to use)
- Connection Type: SSH
- SSH Username: your university login (abcd1234)
- SSH Host: carl.hpc.uni-oldenburg.de
- SSH Password: Check Use password and enter your university password, alternatively check Use key file and give location of the key file (e.g. /home/yourname/.ssh/id_rsa
- At this point, you might want to check if you can connect to the cluster. If the test fails, you may have to install an ssh-client on your computer. Also check, if SSH2 is correctly configured in KNIME. For that, save your configuration so far, then go to File-->Preferences and find Network Connections under General. In SSH2, make sure that SSH2 home points to the right folder (typical .ssh in your home folder. Check if you can connect to the cluster with ssh from a shell/terminal. Once test of the connection to the cluster is successful, continue to edit the configuration of the Slurm Executor:
- KNIME Executable: /cm/shared/uniol/software/6.4/KNIME/3.6.2/knime (location of the executable on the cluster, you can find it after loading the module with
- At this point, you might want to check if you can connect to the cluster. If the test fails, you may have to install an ssh-client on your computer. Also check, if SSH2 is correctly configured in KNIME. For that, save your configuration so far, then go to File-->Preferences and find Network Connections under General. In SSH2, make sure that SSH2 home points to the right folder (typical .ssh in your home folder. Check if you can connect to the cluster with ssh from a shell/terminal. Once test of the connection to the cluster is successful, continue to edit the configuration of the Slurm Executor:
- 7. Java VM Arguments: it is recommended to set memory for JVW, e.g. with -Xmx8192m to 8GB
- 8. Workspace Directory: a directory on the cluster, e.g. /user/abcd1234/knime-workspace, KNIME will use this directory to store data for and during the execution of jobs on the cluster. If you expect a lot of I/O, please use /gss/work/abcd1234/knime-workspace for better performance.
$ which knime
/cm/shared/uniol/software/6.4/KNIME/3.6.2/knime
e.g. in case of a different version)
Documentation
To find out more about KNIME Analytics Platform, you can take a look at this overview.
The full documentation and more learning material can be found here.


